Today I’m going to get into the nitty gritty details on how to sew buttons, like literally any kinds of buttons because sewing buttons is unavoidable; whatever you sew you need to add a button to it especially if you’re sewing bags. I’ll be honest with you here, I found it quite tricky myself. Especially the part where I had to make sure the snaps meet each other.

Pin this image on your sewing board for future reference. Use the button on top.
So in this post, my aim is to touch on all the difficulties that we can face when it comes to sewing a button. This is more like a compilation post with all the tips and tricks you need to know when sewing a button. I’ve selected the best videos which give a proper explanation on sewing buttons, snaps and buttonholes. I’ll be talking about these topics in this post:
- how to sew buttons by hand
- how to sew buttons with a sewing machine
- how to sew buttonholes
- how to sew perfect snaps
How to sew buttons by hand
Sewing buttons by hand is quite an easy task if you know how to thread a needle and tie a knot. You can learn how to sew buttons simply by hand in this video.
All you need is a thread, needle, button and your garment. But, it can take quite a while to sew a button by hand compared to sewing a button by a machine. With machine the task is quite easy and takes less than a minute if you get the hang of it and have the correct supplies. And that’s why you must read the next section.
Disclaimer: This post might contain affiliate links and I will get small compensation if you make any purchase from those links. The money is used for maintenance of this site.
How to sew buttons with a sewing machine
Like I mentioned earlier sewing buttons with machine is quite simple and quick once you have the know-how and the correct tools. So what tools do you require?
- Button presser foot: Yep there’s a special foot for that. What it does is, it holds the button in place while the zig zag stitch is being done so you don’t have to use your finger to hold the button down.
- A
darlingdarning plate
This is something you would need if your machine does not have the option to lower the feed dogs like I don’t have it in mine. And why is it important to lower the feed dogs? So that the fabric doesn’t move when you’re sewing the button. Okay so now that we are familiar with the tools, let’s look at this video on how to sew the buttons using a sewing machine. This is just a general video as every machine is different. You can also just refer to your machine’s manual and learn how to sew the buttons by machine.
Tip: When you’re sewing the button don’t just immediately start with your presser foot. At first use your hand wheel to check if the width of the stitch is long enough to get into both holes smoothly. This way you would avoid any breakage of the needle as well as the button. Now that we’ve got our button right, let’s sew the button hole.
How to sew buttonholes
Ah! Honestly, this is the thing that scares me the most and I haven’t tried it yet. Even when I was sewing my coat, I skipped the button holes because I was so scared I would end up ruining it. I just opted for snaps instead. 😉 Hopefully next time I can muster enough courage to sew the button holes with my sewing machine.
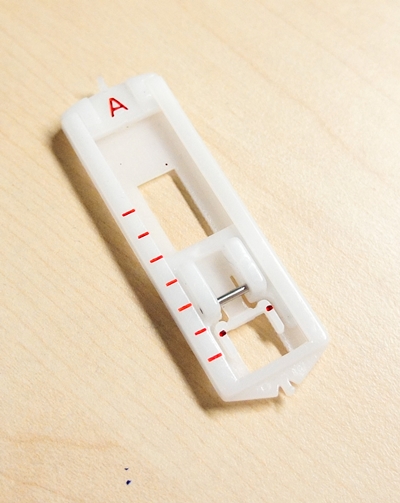
To sew the buttonhole you would require a special buttonhole foot which looks somewhat like this.

And here’s the video showing how to use this buttonhole foot to sew the buttonhole in place.
How to sew snaps
Okay, now moving to our last topic; how to sew snaps. Have you ever faced the problem of mismatched snaps. Like you’re done stitching the snaps in place but when you try to put the snaps together, it won’t work! Ah the frustration! This literally happened with me every SINGLE TIME. Until I found this video with a great snaps sewing tip.
And with this video we come to the end of this blog post. Hopefully now we can all have perfectly sewn buttons in place after watching these wonderful videos on how to sew buttons, buttonholes and snaps. Don’t forget to share this wonderful information with your sewing friends. Pin it on your Pinterest board using the “Pin it” button.


I enjoy your blog and tips and such, but do have a different method of sewing a button on by hand. Actually, just a slight variance, I start the sewing as you, but after I have a “loop” on the button, I put a toothpick under and between the threads. This will allow space for the fabric without the button distorting the fabric, or possibly tearing it.
Oh, that’s a really great idea. Thanks so much for sharing this great tip. This can help in making those fabrics last long. I’ve never heard of such a thing before and I’m definitely going to try it next time.