EMBARASSED!
That’s what I feel when I look at the bags I made back in those days when I was 18.
My ideas were great but the finishing? HORRIBLE
Ya’know what was the biggest problem with my bags?
They didn’t have INTERFACING!
ZOMAGASH!
HOW COULD I!??! Even thinking about this fact makes me cringe!
What bag has NO INTERFACING?
Like, seriously.
But that’s not entirely my fault. I didn’t really understand all that interfacing crap by just seeing the pictures of it online back in 2010. And the worse? I didn’t even know where to even get the interfacing in the land of desert aka Saudi Arabia.
That was my reason for not having a bag with a professional feel and finish.
But that’s not it.
A lot of other things ALSO contribute towards making your bags look pro and all of these are covered below. Read on for 9 bag making tips for professional looking bags.
***AMAZON DISCLOSURE: Sew Some Stuff is a participant in the Amazon Services LLC Associates Program, an affiliate advertising program designed to provide a means for sites to earn advertising fees by advertising and linking to Amazon.com.
AFFILIATE DISCLOSURE: This post contains affiliate links.***
9 Beginner Bag Making Tips for Professional Bags
1) PRESS as you go, really! This is the same rule for when you are sewing garments. Pressing the seams reallyyyyy helps in setting them in and providing that crisp finish to your bags. So, whenever the pattern asks for a press, do it! Don’t be a lazy bum like me.
2) Use fleece or foam. Nothing says homemade more than a wimpy bag that can’t stand on its own. YIKES! Use foam or fleece to add structure to your bags so that they can stand on their own.
3) Use vinyl. I don’t know about you, but plain fabric bags really look homemade to me. There’s something just about those fabrics. If you want to instantly raise the bar of your bags, use vinyl, girl! It makes a great accent as well as instantly gives that pro look to your bags.
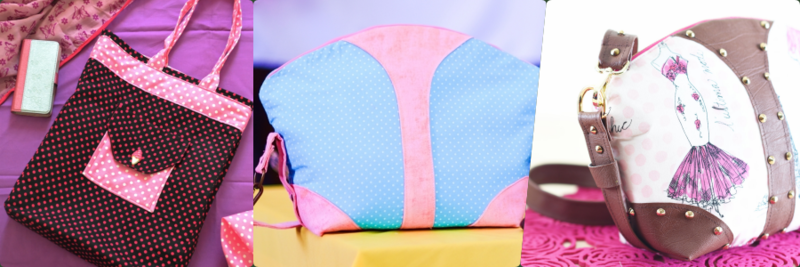
4) Use lots of good quality hardware. Hardware is really the BOMB. The moment you use expensive, shiny hardware, the look of your bag changes from a frog to a prince. Here’s a photo for comparison. Looking at the pics you can surely tell which one of the three bags look most pro.
5) Line your bags! There’s nothing worse than an exposed raw seam in the inside of the bags. I know lining is one DIFFICULT thing especially when you gotta turn the right side out, but trust me, it’s worth it. Here’s a tip to get perfect lining: reduce the size of your linings by 1/2″, if not mentioned in the pattern, to make them perfectly fit inside the bag. Also, add a layer of medium weight fusible interfacing to get a nicely laid lining that’s not all saggy.
6) Top-stitching: Top-stitching is a really easy and quick method of making your bags look pro especially if you use a contrasting heavyweight thread. It adds SO MUCH character to the bags. Though, can be really difficult with a domestic sewing machine.
7) Use a pattern: If you’re new to bag making, consider following a pattern in the beginning instead of drafting your own. This way you will learn a couple of amazing techniques which you can later use to design your own bags and you will have a gorgeous bag on your first try which will give you an instant confidence boost. Designers spend a lot of time in designing a pattern so that beginners can have a fun time sewing the bags so this can really help.
8) Try it on a muslin: When making a bag out of a pattern, FIRST AND FOREMOST make a test version on a muslin to familiarize yourself with the steps JUST LIKE what you would do with a commercial pattern. This way you will not make mistakes AND you can come up with ideas on the changes to make to the pattern.
9) Practice practice: As the old proverb says “practice makes a man perfect”. This is also true when it comes to bag making, the more you sew, the better you will get. If you screw up once, you’d know what to fix the next time and you will automatically have a better-looking bag. You will also feel confident to try much-advanced skills.
10) Learn more skills: As mentioned earlier, bag making is an art. You can always discover a new technique to do a certain thing. So, don’t limit yourself when it comes to acquiring new skills. Maybe a new technique you learn will make the step easier. Check out this class by Lisa Lam of Uhandbags on Craftsy where she shared 20 Essential Techniques You Need for Better Bags. Even as an advanced bag maker, I learned quite a lot helpful stuff from this class. She also shares several tips on installing zippers so if that’s what you have been struggling with, click here to check out the class.
Free Bag Making Course
If you’re new to bag making and want someone to hold your hands and guide you through each and every step of bag making IN DETAIL, then go ahead and join the FREE bag making course by entering your name and address below. In this course, you will learn the names of all the hardware, how to read a bag pattern, and of course, how to sew a bag from start to finish.
Just enter your name and address to get in the course.
By signing up you also agree on receiving weekly newsletters. Unsubscribe anytime.
The End




This was very helpful; thank you.